

![]()
No matter how much you change your desktop background image and switch distro themes, staring at the same computer’s screen day in and day out can become humdrum. Conky can be used to decorate the desktop in endless ways and provide a stream of useful system monitors in the process.
Conky is a system monitor that is sometimes part of the default desktop display in Linux distros. It scans your system’s hardware to match a list of possible sensors and creates a display for you to monitor on your root desktop or in its own window. Conky also can be configured to execute external programs or scripts.
This system-monitoring app displays a variety of status reports. These include CPU activity, disk usage, memory used and remaining, temperature, emails, clock, swap space and more on your desktop in various appearances.
Once you get Conky installed and configured, it works well. It is a passive display with no user interaction needed. But it is cranky to set up.
Picture Pretty
I like the concept behind the Conky Project. It makes good sense to have have system readouts on the desktop. The idea is sort of a takeoff on using widgets anchored to the desktop display. Conky, however, is not a productivity tool other than making it easy to keep tabs on the computer’s performance.
Conky is almost endlessly configurable in terms of how you can have it look. But development support for Conky is sketchy at best. Installation is buggy and support is fragmented among numerous websites that offer a wide range of theme scripts to alter the appearance.
I briefly searched for Conky themes and found these Web locations to view and download Conky themes: Desktopspotting, two at Techdrivein, Linuxandlife or Linuxhaxor.
Using any of the available Conky themes lets you dress up your desktop with unusual eye candy. The displays come in all sizes, colors and shapes. Some of them fit along the right edge of the screen as a transparent overlay so the background image is still visible underneath. Other themes actually spread across the entire screen.
Getting It
Conky is available in several of the main Linux distros’ repositories. But I had limited success with the automatic installation the package manager provided. Installing it that way on both Ubuntu 12.04 and Linux Mint 13 produced an ugly display in what looked like a borderless terminal window.
I think that happens because there is no configuration file included with that installation process. Despite what the distro’s package manager says about the download containing everything you need, it does not.
If you want attractive eye candy rather than just a functional ugly display, you have to do a manual setup process.
Download Hassles
Avoid downloading Conky in its generic form from holding sites. Uncompressing the tarball or finding distro-specific formats will be an exercise in futility. Instead, open a terminal window and stretch your fingers for some command line instructions.
The manual get-and-install process will vary slightly depending on your distro. As a starting point, use these directions. They should work in most cases. If not, check with support forums that handle Conky issues.
Typically, Ubuntu, LinuxMint and Debian distros will work fine with the sudo apt-get commands. Fedora uses the yum install command structure.
Getting Conky downloaded, installed and configured is a three-step process. I tried what seemed more logical and reversed the steps to start with downloading the app before doing the sensor step. That did not work.
Installing Sensors
Conky will not work properly, if at all, unless you grab and install the sensor packages.
Step one is to enter from a terminal window:
sudo apt-get install lm-sensors
Step two involves configuring Conky’s settings for the sensors with:
sudo sensors-detect
Be sure to respond with the word “yes” to all of the question prompts. To be sure that process succeeded, when all is finished enter the command “sensors” without the quotation marks to see a list of all the detected sensor devices.
Making It Work
This next set of steps is critical to successfully completing the process. Again, you will need the terminal window to issue the commands.
Step one is getting the Conky package with the command:
sudo apt-get install conky
This next step is essential. If you do not do it precisely, Conky will only give yo the ugly readout I previously mentioned. This involves using a text editor to create a file and pasting a configuration file into it. Be sure you save it to folder and make it hidden by a period preceding the file’s name. Name this file “.conkyrc” without the quotation marks.
First, go here and copy the code displayed on the open Web page. Then paste this code into your text editor file named “.conkyrc”.
To run the finished product, enter “conky” (again, no quotation marks) into terminal window. A quicker way to do this is to press ALT + F2 keys. This will open a command line box.
Changing Themes
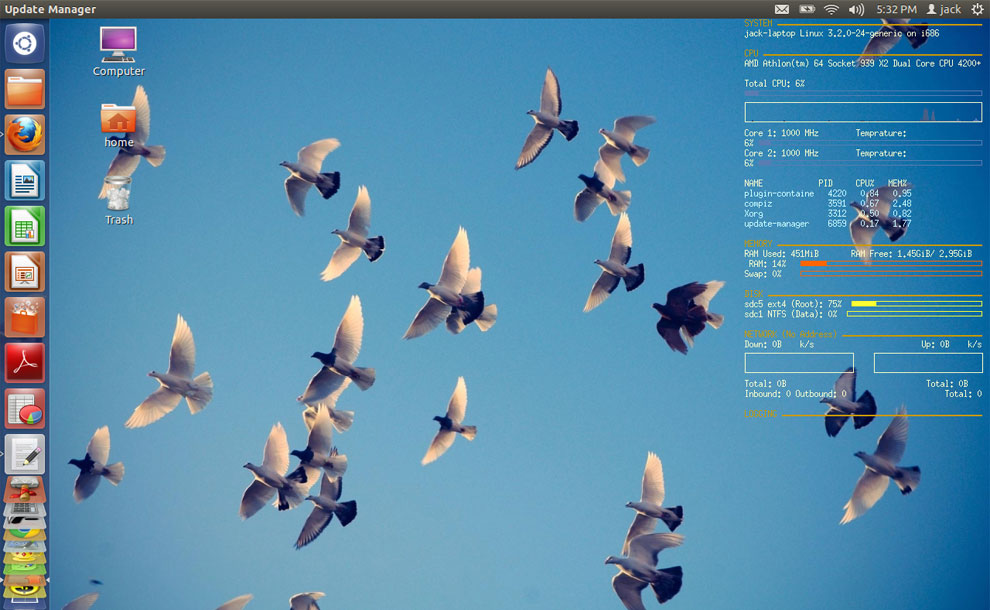
What you should see using the script you pasted into the configuration file is the screenshot displayed above. It will be a mix of yellow headings and white lettering. The various status bars will be colored orange or yellow.
If your computer hardware causes the Conky display to flicker, use a text editor to open the configuration file you created. Edit the entries so “double_buffer” is changed to either ON of OFF. Another fix is to increase the “update_interval.”
Essentially, when you download other Conky themes, the new codes they contain will replace your existing content in the conkyrc file. Depending on the source, the code swap will complete automatically or you will follow the directions for installing the new look.
Other Basic Tweaks
If you stay with the default configuration, you can make some adjustments by tweaking the configuration file. These will alter the general layout, size and color of the Conky display on the desktop.
Adjust the maximum width of the display window with the setting: Maximum_width 320. The default text color is light yellow or:
default_color FFFFCC
Experiment by changing one or more of the letters to get other color results.
Change the Window background color with the setting:
own_window_colour
Make the background transparent. If you want to make the background transparent or visible change the setting “own_window_transparent” to either Yes or No.
If the Conky window disappears when you click on the desktop, fix that by entering the line:
own_window_type override
Optional Wizardry
Getting involved in manually configuring Conky may turn you off to using the app. One option is to let the Conkywizard partially automate the process for you. The wizard handles the configuration chores.
If you are not comfortable with tarball files, the wizard might not be much help. Plus, you must first on your own install the required Conky packages manually. The wizard does not contain code for getting and installing the actual conky app nor the sensors.
Go here or here to download the Conky Wizard application.
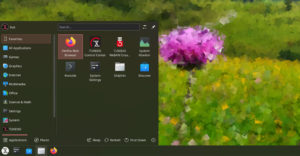
Wizard Ways
The Conkywizard puts a pretty GUI on the Conky configuration process. Once you get it installed from the downloaded .tar.gz format, it is relatively easy to use.
Uncompress the file with this command:
tar zxf ConkyWizard_32bits_V1.0_Beta1.tar.gz
Note: if you downloaded the 16-bit version, be sure to change the name of the file accordingly to uncompress it. Then go to the destination folder and double click the ConkyWizard file to open the wizard.
After clicking your way through the welcome screen, make your settings choices. These include the location of the Conky panel on the desktop, the display’s transparency, the fonts and colors.
Another wizard screen has choices for display position and size of panel. Yet another screen lets you configure the sensor Widgets displayed on the Conky panel. You can also set Conky to run each time your desktop loads so you do not have to issue the manual command to load it.
Bottom Line
Conky brings an array of nice-looking eye candy with a purpose to the Linux desktop. Installing it and setting it up will give you a workout. But once it is up and running, you can forget it and enjoy the view.
Conky’s developers need to keep pace with newer Linux distros to make the app easier to install. Ideally, Conky should be a completely contained package that installs with one click from the distro’s software center. And a bundled and improved setup GUI would be a welcomed enhancement.


You, sir, are missing the entire point behind many users’ obsession with Conky. It’s because of it’s complexity that such fine-tuning is even possible, not to mention, scripting and researching methods does indeed hold its own sense of charm and accomplishment. If Conky became the bubblegum wyswyg that you recommend, it would be ruined and become nothing more than yet another utility that makes the methods behind a Mac user legit and justified, taking all the learning and self-satisfaction of "true" customization out of the picture.
P.S. Stick with Windows, it sounds like your cup of tea.