

![]()
Sometimes the number of choices the Linux operating system provides can be overwhelming. I am starting to look at other options for my preferred desktop environment as GNOME 3 and KDE 4 go in directions that might be unsettling to my computing routine. One obscure yet interesting replacement candidate is Bluetile.
For the last six months or so, I have been supplementing the desktop navigation maze with a docking app. After trying several, I settled into the Avant Window Navigator, or AWN. This approach has worked reasonably well for me. Whether I boot into Gnome 2, or the prerelease version of the GNOME 3 shell, or play around in my used-to-be favorite KDE desktop, a docking app lets me have a common anchoring point that always works the same.
Bluetile so far has been working well with my docking app. This combination provides me with the best of both approaches to getting my work done.
Supplement or Alternative?
Bluetile, which integrates nicely into the GNOME desktop, adds a handy window tiling function to the desktop. It lets me see all of the tiled windows in a configuration that I could duplicate only by manually dragging open windows around the desktop and resizing them so the window borders are touching rather than overlapping.
I have been a persistent user of virtual work spaces to avoid dealing with numerous open, overlapping application windows. I can use my default work spaces easily through the AWN dock or tap into the built-in work spaces that are part of the Bluetile interface.
I often bounce from one work project to another. Each project has multiple spreadsheets and text windows for article drafts and research notes, as well as open Web browser pages. Separating open windows to their own virtual desktop eliminates the need to constantly open and close related files. It also eliminates having to Alt-Tab through a vast number of application windows on one screen.
Also, Bluetile can set up tiled windows in some work spaces but not in others, as my needs change. This is a very promising arrangement. This project is still in its infancy, though, with version 0.5.3 as the current release version. It needs more sophistication to be more feature-full than similar tiling solutions.
Roaming Roots
The Linux world is not lacking in tiling applications. Even the more popular species of this app category have only a targeted following. So far, windows manager tiling systems are more of a novelty or distraction from the alternatives.
For example, some of the more well-known windows manager tiling apps include xMonad, Musca and Dynamic Windows Manager, or dwm. None of these — or even the hapless others in this category — has much in the way of different features. While Bluetile is a younger project, it is a good starting point to check out a window tiling system.
Jan Vornberger, who initially created it as a university project and thesis topic, continued to develop it as an open source project. It handles both stacking and tiling layouts. All of its features are accessible from both mouse and keyboard.
Limited Lineage
While other windows manager tiling systems are available in many Linux distros, Bluetile so far is not. It is only available for Debian and Ubuntu distributions.
It also needs the Gtk2hs library. That was not a problem with my Ubuntu 10.10 setup. The Bluetile package installed and ran without any glitches.
The default gray drab theme is not too inviting. But if you do not mind tinkering with the configuration file, you can choose your own color combination. You configure this app by editing the file <<~/.bluetilerc>> . It is easy to access.
Just click the C button in the Bluetile panel that displays vertically on the left edge of the desktop — but I warn you, the file is not very user-friendly. You will need to check all the defaults in the file <</usr/share/bluetile/etc/bluetilerc>> .
Starting It
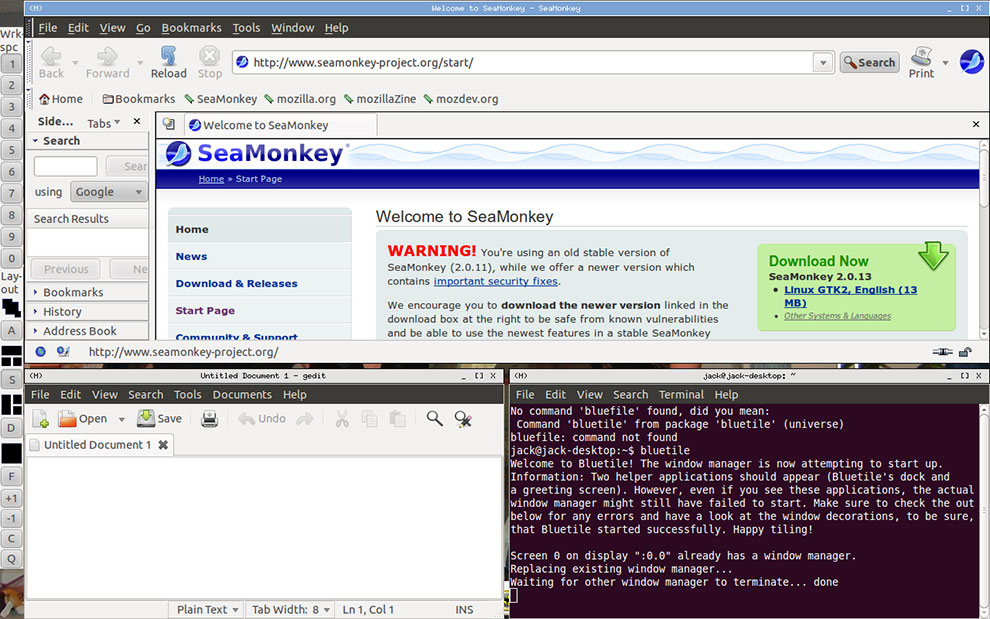
The easiest way to get Bluefile up and running is to load it manually after you boot into the desktop. Just open a terminal window and type the load command: Bluetile.
This may be a hassle if you use it all the time, but I like the flexibility of not having it load automatically.
The installation process puts the Bluetile files in the directory ~/.cabal/bin by default. You can set Bluetile as the default window manager under GNOME by adding that path in the environment variable WINDOW_MANAGER. Just add the line into ~/.gnomerc.
Using It
If you plan to continue using Bluetile, make sure you include its repository in the Update Manager of your Linux distro. Bluetile’s repositories are located at http://code.haskell.org/~jav/.
The interface is present as a vertical panel that sits along the left edge of the desktop. Bluetile builds in 10 work spaces by default. Moving from one to the other is as simple as clicking the appropriate space number.
Bluetile also has buttons for the available window layouts. For instance, you get four basic layouts. Click the A button to get a stacked design. Click the S button to have a large top window and two equal-sized smaller windows underneath. Click the D button to have a long vertical window on the left and two equal square windows to the right. The Q button quits the windows manager and returns control to the default GNOME manager.
Once Bluetile starts, you will see a pop-up window that explains the screen elements and some basic hot keys. This is all you need to gain a working knowledge of the app’s features.
Hot Key Hotties
Keyboard shortcuts are a basic part of most tiling system interfaces. Bluetile is no exception. You can either click the appropriate button on the vertical panel or press the keyboard combinations to let Bluetile do its job. For example, Win+1 through Win+0 keys switch to the various work spaces. Add the N key to the sequence move that application window to the designated workspace.
Other key combinations add to the mix in rapidly navigating multiple open applications on a bevy of work spaces. For instance, Press Win+Shift+c to close the focused window. Press Win+z to Maximize/zoom a focused window, and press Win+m to Minimize a focused window.
Similarly, pressing Win+Shift+m restores the next minimized window, and pressing Win+o shows the window menu for a focused window. The Win+t combination pushes the dialog window back into tiling.
Here are a few more hot keys I use to fly through my road list of open applications. The Super + H or L keys resize the master area or larger window area. The Super + U or I keys resize the slave area or smaller window area. The Super + Shift + J or K keys let you swap the next/last window with the focused window.
Other Stuff
One really cool feature of Bluetile is its ability to let you override the tiling paradigm by dragging an open window to an existing location. The window you moved into the new area on the screen bumps the current window, forcing it to change places.
A related feature lets you start to drag a window corner. Then the location of the larger and smaller tiled windows change to accommodate your manual directives.
Bottom Line
Bluetile is a novel way to work on the GNOME desktop. This program, as is, can be an effective alternative to other window managers.
However, tweaking it and altering its configuration file leave much to be desired. If the developer can address these usability needs, Bluetile can advance ahead of the other tiling apps that are out there.


I tried Bluetile with KDE out of total curiosity. I build my ubuntu desktops with gnome and add KDE afterwords so I get the best of both worlds.
I liked the concept of what they’re doing, but unfortunately they stole my kde menus and sidebars in the process. I’d like to see something like this run concurrently with KDE