

If you are on the hunt for a do-everything photo management app, checkout Album Shaper. Considering its solid, user-friendly design, Album Shaper is packed with a hefty toolset offeatures that newcomers to image manipulation programs willappreciate.
That does not mean more experienced digital shutterbugswill feel left out. Album Shaper's simple menu-driven structure,though, may make the app seem too basic for them. Just don't let thesimplicity lead you to that conclusion too hastily.
Newcomers to digital photo management often find programs the likes ofGIMP (see my review here) a bittoo complicated. Users who know their way around photo apps often seeF-Spot (reviewed here) needing a bit more oomph!
I fall into that latter category of users. To me, Album Shaper has morethan enough oomph to make it a suitable replacement for GIMP withoutcompromising on the tools I usually use.
It is the ideal PC solution to accompany a digital camera. AlbumShaper needs little manual scouring to organize, annotate, frame,enhance, style and share your digital photos. It handles with easeopen formats like XML, JPEG, and XSLT. Plus, its cross-platformavailability makes it painless to maintain the same photo albums onWindows, Mac OS X and Linux/Unix computers.
Appearance Counts
Setting up your photos in Album Shaper is much like organizing atraditional physical photo album. You can create as many differentalbums as you need. This is akin to starting a new physical photoalbum. You load each one from the File/Open menu.
Once you open or create an album, the left column of the displaywindow lists the various topics within that album. This is likeputting specific pictures onto their own subject-related pages.
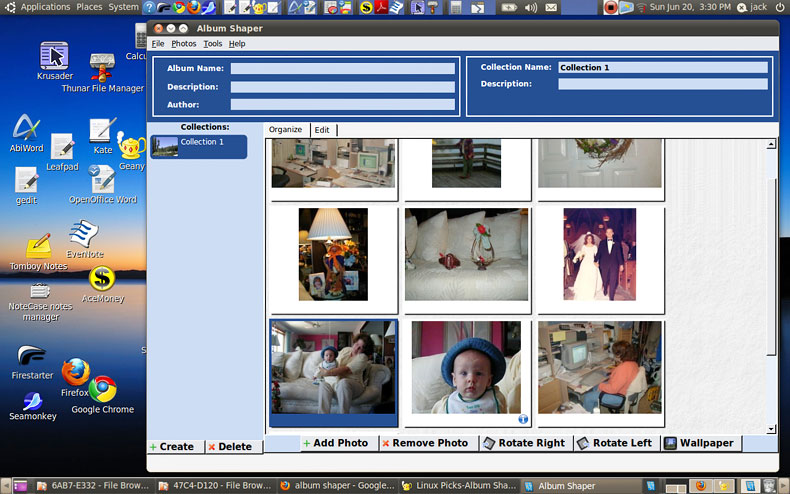
The banner atop the display window has separate lines for the albumname, its description and the picture taker's name -- called "author" --are on the top left. The collection's name and its description are onthe top right.
Below this banner is a display of the photos added to that collection.The pictures show in a series of rows made of three photos in eachrow. The picture size is not adjustable. You scroll down to view thecollection.
Simple Navigation
The menu row above the banner is minimalistic by function. Almost noneed exists to go to the File, Photos, Tools and Help options.
All of the image tools are available after you click on a picture orclick the Edit tab in the row above the display window. Return to thecollection display by clicking the Organize tab. This is where theease-of-use comes into play.
Controls for photo manipulation are hidden until you specify a photo.Then the tools for editing the image appear under the selected photo,which now fills the full display area. Controls for the openedcollection are handled by clicking the button row at the bottom of thedisplay window. It is there that you can Create and Delete collectionsas well as add/remove photos and rotate right/left.
Be careful with the last button choice labeled "Wallpaper." It willchange your system's desktop background to the image selected in thecollections display window. No redo is available. To go back to whatyou had, you must use the operating system's desktop setting.
Picture Handling
Applying photo edits could not be easier. Three control boxes openbeneath the selected photo.
The frame box provides choices for photo sizes and cropping. An optionis also available to correct image tilt. This is a high-end featurethat I do not often see in photo album apps.
The Enhance controls provide options for color, contrast and red eyecorrection. One click does most of the work. If you want to doadditional refinements, click on the levels button to see aside-by-side comparison as you work with the slide bar. The sameadvanced setting exists for granularity.
I like the results obtained by simply clicking on the control buttons.That seems to fix things just fine in most cases without resorting tothe more intimidating histogram approach in the advanced settings.
The Manipulate control box has drop-down selections for B&W, Sepia,Invert, Emboss, Mosaic and Painting. A small viewing window shows theresults before clicking the Apply button.
To undo any of these editing changes, you have to go to the Photo menuon the main toolbar row. Select Revert to Original. You will not seethis option unless there is something to undo.
Minor Quirk
In most areas I really like the simple design Album Shaper uses.Its context-specific editing options go a long way in preventing anunwieldy interface.
However, one area that needs better focus is the process for adding photosto a collection. I have a rather large assortment of photos. These arestored under several dozen folder names.
Album Shaper lets me tag all of the photo files within one folder andimport them. But there is no way to input multiple folders at once.
A Work-Around
This means that each segment must be added one by one. That is fine ifyou just start out with a small array of photos. But if you want toswitch from one photo management app to another, Album Shaper couldmake the task more approachable.
An option odes exist, though it still is not a perfect solution. AlbumShaper makes extensive use of drag and drop throughout the albumcreation process.
I can highlight photos from a file manager opened on the desktop anddrag them to the organize view on the Album Shaper display window.This trick can be a nice time-saver. But the OS does not let me dragmore than one folder at a time. So this ability is still lacking inAlbum Shaper itself.
Other Niceties
Album Shaper can produce Web galleries and can export photos in anumber of formats. It also lets you tag multiple images within acollection and execute the same function. For example, you canremove a number of photo descriptions at once.
A nice bit of eye candy in Album Shaper is the ability to set album andcollection cover images. A small version of the selected photo slidesin from the left and is used when creating Web galleries.
Similarly, you can set a collection's cover image by dragging anddropping a photo to the left of the collection name and descriptionfields. To label photos just hover over a picture and click the littleinfo button that appears in the lower right corner. The photo thenexpands to give you a better view and provides space for writing thecaption.
Summary View
Overall, I am impressed with Album Shaper. Its simply interface anduncluttered approach to menus gives the impression that it is abeginners-only app, but Album Shaper has a lot to offer shutter prosas well.
Why contend with an intimidating toolset that discourages use when youhave this powerful alternative? I prefer this photo management systembecause it combines out-of-the box functionality with a novel approachto taking care of my photo collections.


Looks better then F-spot and Shotwell but still can’t beat Digikam for me personally.