

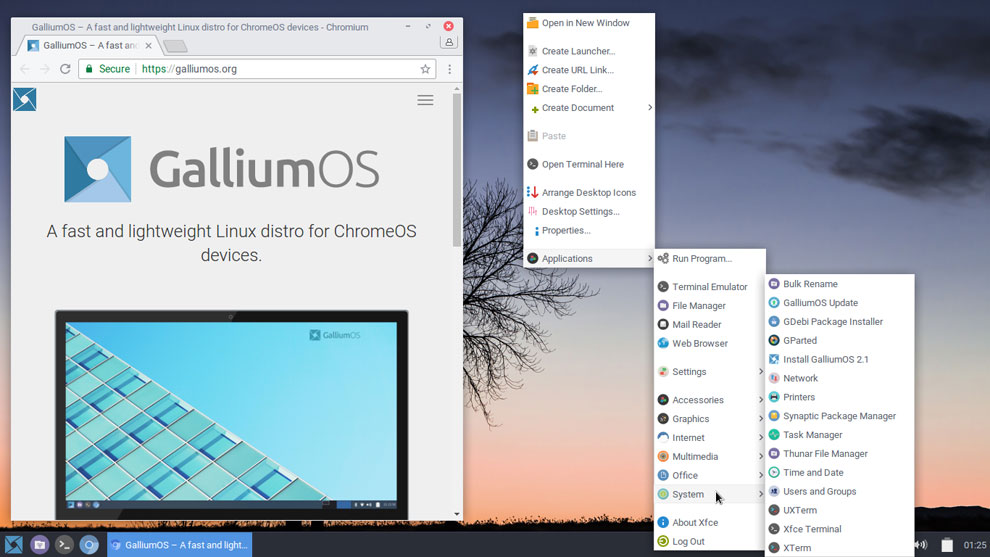
GalliumOS is a Chromebook-specific Linux variant. It lets you put a real Linux distro on a Chromebook.
My recent review of a new Chromebook feature — the ability to run Linux apps on some Chromebook models — sparked my interest in other technologies that run complete Linux distros on some Chromebooks without using ChromeOS.
GalliumOS is not a perfect solution. It requires making a physical adjustment inside the hardware and flashing new firmware before the GalliumOS installation ISO will boot. However, it can be a handy workaround if your Chromebook does not support Linux apps and/or Android apps.
Related: How To Run a Full Linux Desktop on a Chromebook. This alteration will give you access to both complete operating systems running simultaneously so you can move between them with a keyboard shortcut.
If you follow directions explicitly and can wield a screwdriver to remove the bottom panel, GalliumOS is an ingenious Linux distro that can give you the best of two computing worlds. You can install it as a fully functional replacement for the ChromeOS on a compatible Chromebook. You can install it as a dual boot to give you both ChromeOS and a complete Linux distro on one lightweight portable computer.
After I successfully flashed the update firmware to the aging Chromebook and succeeded in booting the live session GalliumOS, I was curious about how supportive the changes would be for other Linux distros. I tried booting the Chromebook into two other Linux live sessions I previously tested for reviews on USB drives.
The GalliumOS firmware replacement only works with this distro. Both Puppy Linux and Quirky Linux failed to boot with the Gallium OS firmware. It also does not work on all Chromebooks. The GalliumOS developers hope to have versions for all hardware combinations eventually. Older technology uses Crouton to install other compatible Linux distros, such as Ubuntu or Linux Mint, or Arch Linux.
Checking Out GalliumOS
My ideal computing platform is in a state of transition this past year. I started to integrate the Chromebook with its added flexibility from Android apps. Then I expanded that flexibility by adding a few Linux apps to the mix on a Chromebook.
I started to enjoy the extremely lightweight Chromebook hardware with its superpowers from Android and Linux apps running on ChromeOS. I found myself spending more time working outside of my office and its large monitors with full-blown Linux operating systems. The Chromebook’s smaller and lighter footprint offered a nice change of pace from working on bulkier laptops running full Linux configurations.
I successfully repurposed an older Chromebook to transform it into a fully functional Linux machine running GalliumOS. Now I have to rethink my standards for what comprises my ideal computing platform.
What It Offers
GalliumOS is based on Xubuntu. GalliumOS includes optimizations and many fixes for the ChromeOS-based hardware. This retooling greatly reduces system stalls and improves overall responsiveness.
It runs the Xfce desktop. This is the default desktop for Xubuntu, and it is a good choice for the lightweight hardware specs of most Chromebooks. The OS performed fast, both in the live session delivered from the USB drive and later as fully installed.
GalliumOS has noticeably faster bootup. It boots faster than other Linux distros, almost matching the nearly instant-on performance of ChromeOS on Chromebooks. Much of that speed results from fewer services, a smaller kernel, and the Lightweight Display Manager (LXDM).
The Xfce desktop GalliumOS runs is stuffed with features and configuration options. You can use the default settings for a pleasing, efficient, out-of-the-box experience or create a more personalized desktop appearance.
What It Is
GalliumOS 2.1 was released early last year, which makes the distro a bit overdue for a major release upgrade. However, it works reasonably well and does get the regular package and system updates.
The latest alpha version of GalliumOS 3 is version 3.0alpha1 released this summer. Since I am experimenting with this process, I tested the older stable version. This levels the field by using a known, reliable ISO with fixes and updates already in place.
You can download GalliumOS 2.1 installation images here. The make and model of your Chromebook, along with its processor name, will determine which ISO to get. You can find that information on manufacturers’ websites, the Chromebook’s documentation, or from the GalliumOS hardware compatibility chart referenced in this review.
You can preview GalliumOS in a “live boot” environment from the same image without fully installing it. However, getting to the live session is not as simple as burning an ISO to a USB drive and rebooting the Chromebook.
Challenging Process
This distro requires considerable preparation for the Chromebook before you can run the live session or install it. Of course, you can reverse the changes and restore the ChromeOS if you dislike GalliumOS.
However, be forewarned. Getting to the live session stage takes some work. Undoing that work is a bit faster because you are already familiar with the process.
The extra effort in transitioning the Chromebook into a Linux box can be worth the effort. The process is a bit daunting if you have never toyed with the innards of a computer. That said, the numerous hours I spent researching the steps and attempting trial-and-error conversations paid off.
Before starting this process, save any locally stored documents, audio, and video files. Along the way, your Chromebook will reset and remove these files. Files already stored in your cloud account — Google Drive or Dropbox, for instance — will not be harmed.
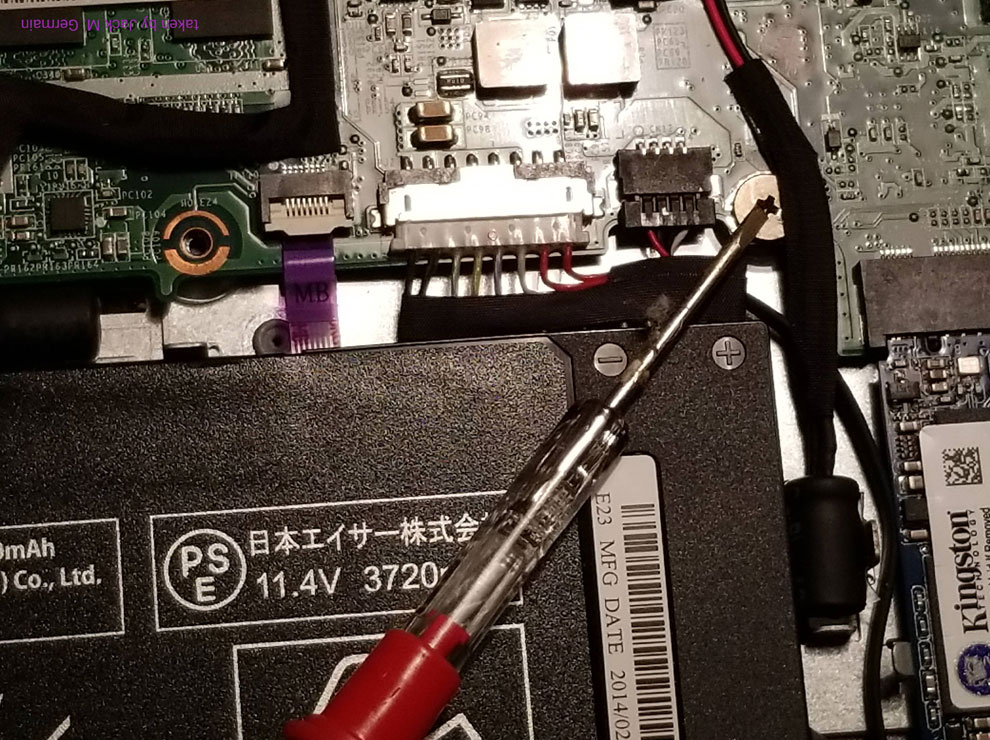
One of the most critical steps in the process is opening the Chromebook to disable write protection. You might be lucky and not have to perform this procedure on your Chromebook model, but more Chromebooks than not need this done. Otherwise, the ISO will not load.
That is the first part of the conversion procedure. The second part is flashing firmware to enable the new OS to run on your Chromebook.
Know What You Have
Depending on your Chromebook, the BIOS is write-protected either through physical or software methods. The usual approach controls write protection with a screw on the motherboard. Some models have conductive stickers. A few older models have a jumper. Another variable is their location and appearance. In all cases, you can access them only by opening your device.
Check the hardware compatibility chart here. Write down three key items from the chart: Model, Hardware ID, and Processor. You will need them to get the correct firmware replacement and write protect location.
Chromebooks with Sandy Bridge, Ivy Bridge or Bay Trail processors need the physical write protection removed. To find out what to do about removing write protection, do a Web search using the model or hardware ID. Use this search string. Do not include quotation marks or caret symbols. ” chromebook disable write-protect” In most cases, the procedure is very similar to what I did with my Acer C720 Chromebook. Use a small Phillips head screwdriver.
- Remove the 12 or more screws that rim the bottom panel of your Chromebook.
- Carefully loosen the edges of the panel and pull it from the rest of the chassis.
- Then follow the information you found on removing the write protection physical device.
Making a Bootable USB Drive or SD Card
This process is a bit different from using standard Linux tools to burn the installation to DVD from the downloaded ISO. Use another computer to prepare the USB drive or SD card. Download Etcher here. You can keep the Etcher file in your Download folder along with the correct ISO file you downloaded from the GalliumOS Website.
It is a three-step process. Etcher has a simple user interface. Some USB drives are finicky when it comes to creating a bootable partition, so have several different manufacturers’ drives on hand. I went through two USB drives before it worked.
Click on the Etcher application to start the process. When Etcher loads, click the first button labeled “Select Image.” Point the file picker to the GalliumOS ISO file.
Then click on the second button, “Select Drive,” to click on the location of the USB drive or SD card. Do not select the wrong device. The formatting process will destroy all existing data on the selected device.
Lastly, click the button marked “Flash.” After a few minutes, the file-burning process will complete. You are now ready to continue with the software infusion onto your Chromebook.
Moving to Developer Mode
In order to let the Chromebook boot from the live session USB drive or SD card, you must boot it into Recovery Mode to switch over to Developer Mode. First, with the Chromebook turned off, plug in your bootable USB drive or SD card with the GalliumOS installed. To turn on the Chromebook, press Esc + F3 (refresh) + Power.
Some Chromebook models lack function keys. Look for the refresh symbol on a key on the top keyboard row. It shows a circular arrow.
The screen now displays the Recovery Mode boot warning that “ChromeOS is damaged or missing.” Do not panic. It is neither missing nor damaged.
Switch the Chromebook into Developer Mode and enable legacy boot mode. This is different from switching to the Developer Channel from within a running ChomeOS session. Enabling Developer Mode will erase all user data in ChromeOS.
Press [Ctrl+D] to enable Developer Mode. Then follow the confirmation steps by pressing enter when requested.
This will take a while. When the process is completed, the Chromebook will beep twice and display a new white screen. Click the blue “Let’s go” button to continue.
The Chromebook will reboot to a white screen that says, “OS verification is OFF.” This is Developer Mode.
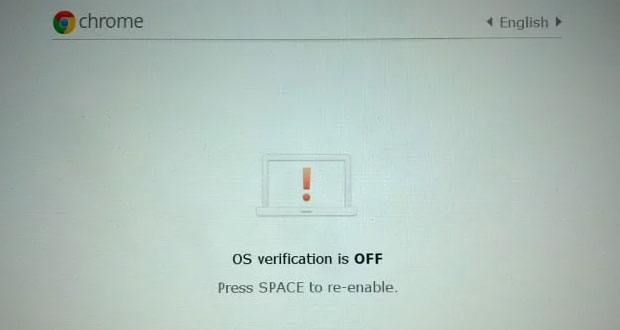
Ready to Go
Well, maybe. If your Chromebook’s firmware already supports booting from USB or SD devices, you are now ready to run GalliumOS in a live session.
With the Developer Mode screen visible, press the CTRL + L keys to reboot the Chromebook from the external device. Each time you exit GalliumOS or power off the Chromebook, when you restart the computer, it will boot into the Developer Mode screen. Start GalliumOS again by pressing CTRL + L.
Once you install the Linux OS, the Chromebook will boot directly into the GalliumOS.
Transplanting Firmware
If your Chromebook has one of the processors noted earlier, You have one more major step to accomplish — flashing the firmware.
Now that you are running Chromebook in Developer Mode, sign into WiFi and accept the Google Chrome OS terms. Or you can sign in as a guest for the firmware update.
Once you are signed into ChromeOS, open a ChromeOS terminal or Crosh window by pressing CTRL+ Alt + T. At the prompt, enter the command “shell” and press the Enter key. (Do not use the apostrophe marks.)
At the chronos@localhost / $ prompt, enter this command line:sudo crossystem dev_boot_legacy=1Once again, you will need the Hardware ID and CPU family from the chart previously mentioned.
Use the Chromebook’s Web browser to return to the Hardware Compatibility Custom Firmware page. Go to the column where your Chromebook’s name and model are listed.
Find the link provided and click it to start the firmware download. This process will take several minutes to complete
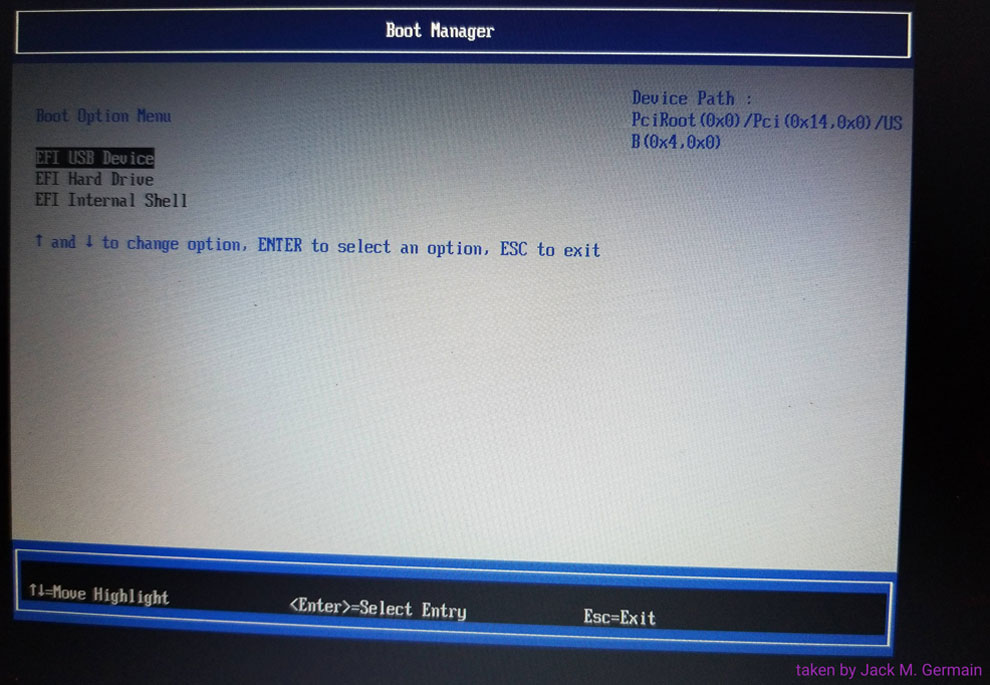
When the firmware download and installation are completed, reboot your Chromebook. At the BIOS screen, press the Esc button and then select the USB or SD device.
Your Chromebook will boot into live session mode. When you install GalliumOS and reboot the computer, it will boot into Linux automatically with no trace of ChromeOS.
Keyboard Tinkering Needed
The fewer keys on the Chromebook keyboard is an issue. The Chromebook-specific combination keys do not work in the Linux distro. For instance, there is no caps key. There is no delete key. There are no function keys. No num lock key or number pad.
Instead, you rely on workarounds designed into GalliumOS. The distro includes five keyboard layouts customized for Chromebooks. Configure them from the GalliumOS/Whisker Menu, in Settings >> Keyboard >> Layout >> Keyboard Model.
You access media and function keys either with or without pressing the selected “Overlay” key first, depending on your choice of keyboard layout. These layouts are stored in /usr/share/X11/xkb/symbols/chromebook.
To modify the functionality of a key, change the appropriate file. For instance, to remap the power key to Delete, add the following line in the appropriate file: key {[ Delete ] }; and set the power button to “Do nothing” in the Power Manager menu.
Solid Impressions
GalliumOS performs very reliably. The more I used my favorite Linux apps on the Acer C720 Chromebook, the more pleased I became with this lightweight and very functional Linux mini laptop. The hardware configuration includes an Intel Celeron 2955U 1.4 GHz (2 MB Cache) processor with 2 GB of DDR3L SDRAM. The unit has a 32-GB Solid-State Drive, a 12-Inch Screen, and Intel HD Graphics.
GalliumOS with the Xfce desktop drives this hardware much better than ChromeOS. I was not pleased with the sluggishness that resulted when too many Chrome browser tabs were opened. The ChromeOS often seemed just to limp along. I detected some of that same sluggishness with numerous tabs opened in the default Chromium browser.
The optimized Linux innards the GalliumOS developers designed to replace ChromeOS greatly improved this Chromebook’s performance. The default Chromium browser was less peppy. I solved that weakness by running the Firefox browser instead.
The Chromebook was giving me 8 hours of battery life. The “revitalized” Linux Chromebook stays alive for nearly 9 hours. That sure beats the battery power of my newest laptops running other Linux distros.
The Synaptic Package Manager handles a steady stream of system updates and software additions/removals. The default software is typically light for Xfce. No office apps are installed. The Chromium Web browser is the only provided browser. It is lighter than Google Chrome but still provides access to Google’s software infrastructure.
Bottom Line
The number of applications you build into GalliumOS is dependent on the SSD or HD storage of the host Chromebook. In the case of the Acer C720’s 32-GB Solid State Drive, the default installation — along with a few large added Linux applications that include LibreOffice 5, Firefox browser, GIMP, and the Geany IDE text editor — left me with 7.6 GB of free space.
The C720’s hardware is aging. I have no doubts that GalliumOS performs much more energetically on newer hardware configurations. Still, given the original low price I paid for the Chromebook a bunch of years ago, and the zero cost of downloading the Linux OS and the firmware, I have no complaints.
Turning a Chromebook into a “Linuxbook” also eliminates one of the long-standing criticisms of nonbelievers. I never had an issue with not having an Internet connection to use the ChromeOS apps. That is a non-issue running Linux on the Chromebook.
Suggest a Review
Is there a Linux software application or distro you’d like to suggest for review? Something you love or would like to get to know?
Email your ideas to me and I’ll consider them for a future column.
And use the Reader Comments feature below to provide your input!


Have you compared streaming video play duration between ChromeOS and Gallium + Firefox? Think Youtube / Netflix / DailyMotion / Cable_Go apps.
In my own experience I haven’t found any OS/Browser combination that gives me longer play duration than ChromeOS on the C720 Peppy 2955u Haswell hardware.
The only way I outperform it is if I use mpv+youtube_dl to play the video URLs via VAAPI hardware decoding, but that’s a bit tedious.
I’ve tried enabling VAAPI hardware decoding in Chromium but that comes with its own drawbacks, like compiling for 40 hours, self-signing and generating google API keys, again too tedious.
So I went back to ChromeOS + crouton + Trusty + some selective Xenial apps installed into Trusty. But as you know Google ceased updates for Peppy July 2019 so I’m having to look at alternatives.