
Every Linux user who takes their privacy seriously understands the importance of using a virtual private network or VPN. Establishing a secure connection to a VPN server protects a device’s IP address and encrypts internet traffic between it and the server.
There are many VPN protocols available, each with its pros and cons. In this guide, you’ll learn how to establish a secure connection using OpenVPN on Ubuntu.
Why Use OpenVPN on Ubuntu?
Ubuntu has supported the OpenVPN protocol out of the box for years, meaning it’s straightforward to set up.
This feature is particularly useful if your chosen VPN provider doesn’t have a Linux client. From a security perspective, connecting to a VPN directly via Ubuntu’s Network Manager is much safer than installing an extra app, which may contain undisclosed bugs.
Established in 2001, OpenVPN is known for its security, reliability, and interoperability with most devices. In 2018, Ubuntu introduced built-in support for the protocol.
Isn’t WireGuard Faster Than OpenVPN?
These days the newest WireGuard VPN protocol has become popular, as it can be much faster than OpenVPN due to running in the operating system kernel.
Traditionally, OpenVPN has had to copy data packets from the kernel to user space for decryption and then from the user to kernel space again to encrypt them. It also uses single-threaded processing, meaning it processes instructions one at a time.
These limitations made OpenVPN much slower than WireGuard. However, the development of OpenVPN DCO (Data Channel Offload) has allowed OpenVPN to operate in the kernel space and use multi-threaded processing. These enhancements have significantly narrowed the speed gap between OpenVPN and WireGuard. Make sure to check with your VPN provider to see if they support DCO to take advantage of this speed boost.
How OpenVPN Works on Ubuntu
Establishing an OpenVPN connection on Ubuntu simply involves downloading the relevant configuration files and importing them into the Network Manager via the GUI. You only need to use the command line if you want Ubuntu to connect automatically to the OpenVPN server upon login.
Step 1. Obtain Configuration Files
You’ll first need the relevant configuration (.ovpn) files to establish a secure OpenVPN connection.
Most major VPN providers offer these via the main dashboard when you log in with your account.
The configuration files list key information such as the server address and ports used, information necessary to verify the server identity and secure the TLS control channel, and other settings.
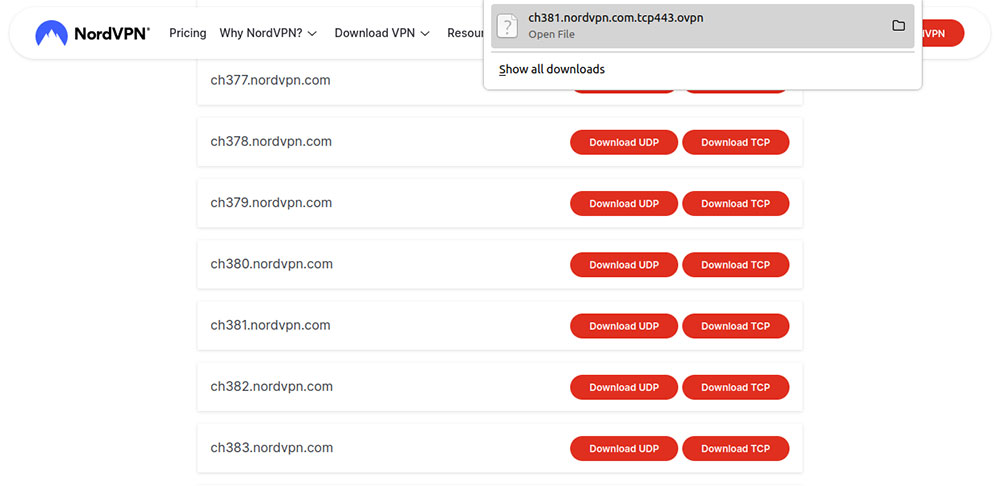
Usually, there’ll be a list of configuration files for each VPN server your provider operates.
OpenVPN supports both TCP (Transmission Control Protocol) and UDP (User Datagram Protocol). Your provider may offer you configuration files for both protocols. If you’re uncertain, choose TCP — it can be slower, but overall, it makes for a more reliable connection.
Step 2. Import VPN Configuration
After downloading the OpenVPN configuration file, return to the Ubuntu desktop. Click the network menu at the top right of the screen and choose “Settings.”

You’ll see that the “VPN” section in the network window currently shows as “Not set up.” Click the “+” sign to display the “Add VPN” window. Next, select “Import from File.” From here, you can navigate to the .ovpn configuration file you downloaded earlier.
The network settings menu will now display the OpenVPN details. You can most likely leave the default settings as they are but pay close attention to the “Authentication” section.
Here, you’ll need to enter your login information in the “User name” and “password” fields.
Some VPN providers use dedicated login and passwords for manual OpenVPN setup. Before proceeding, check with them to ensure you enter the correct information. Then, click “Add” at the top right.
Step 3. Test Your OpenVPN Connection
Now that your VPN configuration is fully imported, you’ll see it listed in the ‘VPN’ section of your Ubuntu network settings menu.
If you plan on importing more configurations, take a moment to click the settings gear next to the current name, then click on the “Identity” tab. From here, you can write something more memorable in the “Name” field, such as “Switzerland – OpenVPN.” Click “Apply” at the top right to save any changes.
Next, hit the rocker switch next to the VPN name. You can now open your web browser to check that the VPN connection has been established.
Use a site designed for this purpose, like DNS leak test.
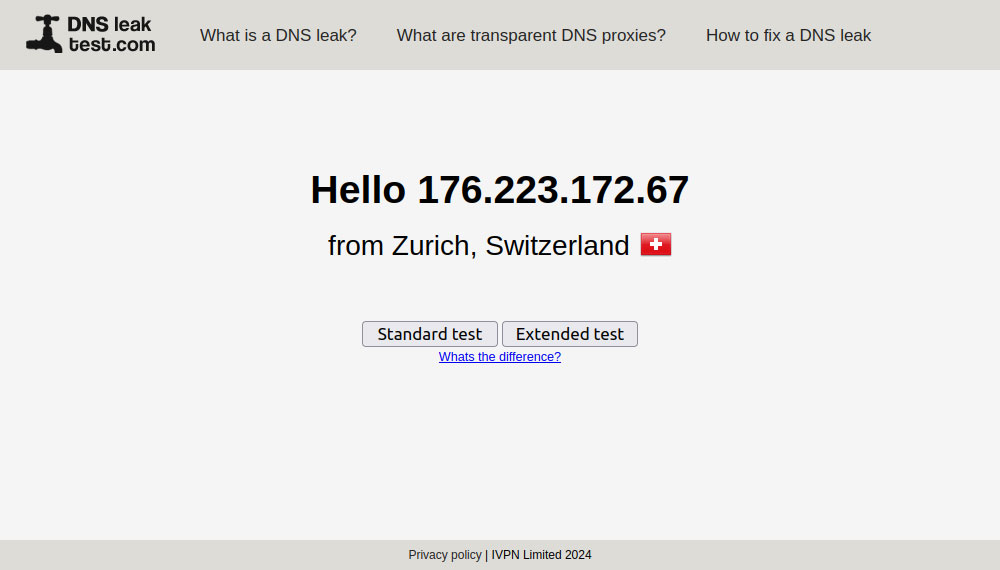
Choose “Extended test” to ensure that your DNS requests are also being routed via VPN servers, which prevents DNS leak.
Step 4. Add Multiple OpenVPN Configurations
At this stage, if you want to connect via OpenVPN using multiple protocols/servers, you can repeat steps 1 to 3 to import additional configuration files. If you do this, additional VPN connections will be listed in the relevant tab in the network settings window.
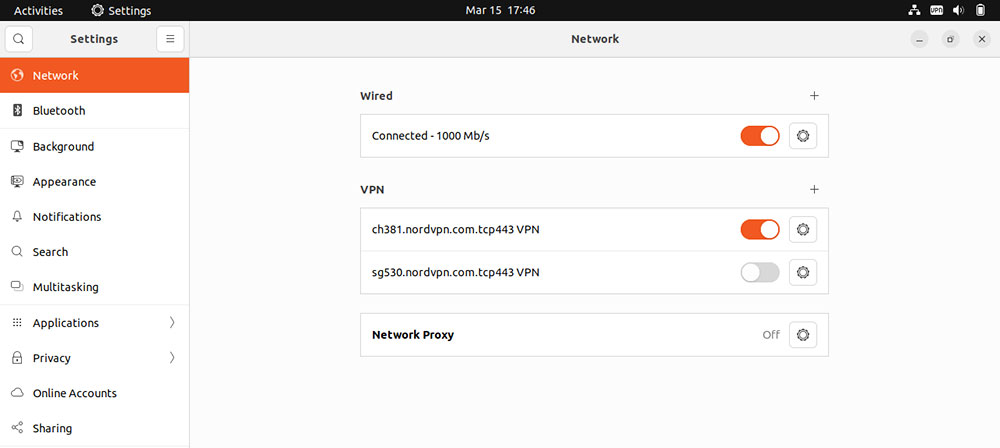
Each VPN configuration has its own rocker switch, but remember you can only establish an OpenVPN connection to one server at a time. If you try to establish an OpenVPN connection while already connected to another, the second will fail.
You can click the network icon at the top right of the Ubuntu desktop at any time to display which OpenVPN connection (if any) is currently active.
Step 5. Set Up Auto Connect
Although Ubuntu supports OpenVPN connections out of the box these days, the current network settings interface doesn’t support automatically connecting upon login.
This lack of an automatic connection feature is a security concern, as you could start using internet apps while unaware that your real IP address is exposed.
For now, you can use a workaround by opening the old Ubuntu connection editor. Simply open Terminal and run:
sudo nm-connection-editor
From here, select your usual access point, such as your home Wi-Fi network, then click the settings gear at the bottom left.
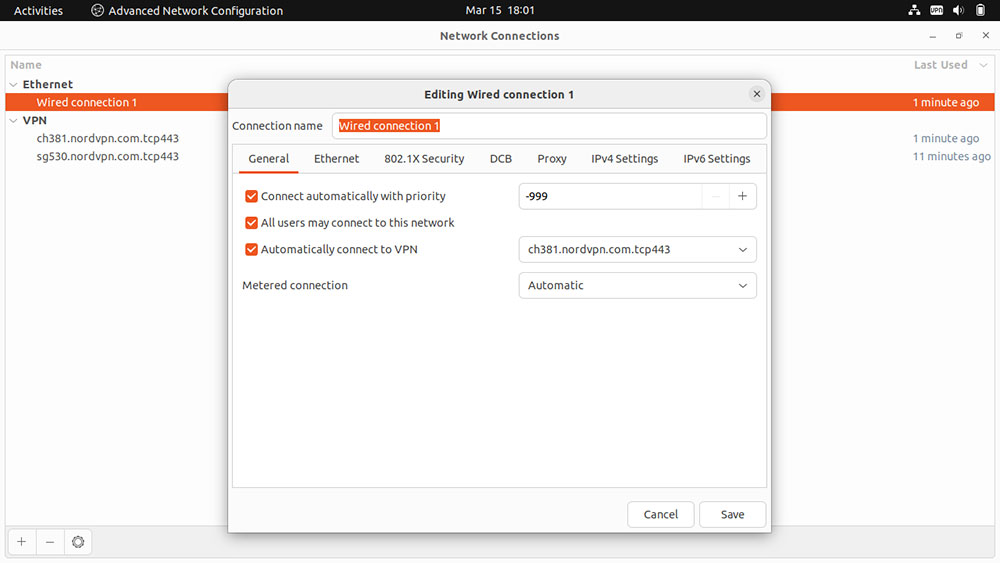
Click the “General” tab, then check the box marked “Automatically connect to VPN.” Using the drop-down menu on the right, select your desired OpenVPN server, then click the Save button.
Connect With Confidence
Using OpenVPN on Ubuntu provides a reliable and secure way to protect your online privacy and encrypt your internet traffic. By following the steps outlined in this guide, you can set up and manage your OpenVPN connections through Ubuntu’s user-friendly Network Manager.
Remember to test each configuration to ensure your VPN is working as expected, and for a more tailored experience, adjust the advanced settings to suit your needs. Whether you’re working from a cafe or browsing from home, connecting via OpenVPN on Ubuntu helps keep your digital life protected and private.