

![]()
How many times have you accidentally deleted a photo you really needed from a digital camera or attached storage medium? We've all been there and done that! Sure, if you delete most files -- even some standard graphics images -- from the hard drive, the Linux trash can visibly holds the goods.
But unless you know about PhotoRec, your deleted photographic images and files from anywhere else stay buried in hidden-file hell. PhotoRec is a powerful recovery tool that is part of a larger disk and file recovery package.
PhotoRec's file data recovery assets help you retrieve lost videos and other types of graphics files from hard drives and memory cards on digital cameras. This undelete marvel also works its charm on so-called erased files on USB and smartcard devices along with CDs and DVDs.
It also retrieves documents and archives from various storage locations. But perhaps the most valuable trick PhotoRec does is undo deleted volumes on hard drives and fix trashed partition tables. This application saved me from digital disaster a few times when no other recovery app worked.
Dual Personality
It runs cross-platform and is available for most Linux distros. PhotoRec's power is deceiving. In fact, this digital file retrieval tool is actually hidden from view. But it is found waiting for you in plain sight -- almost.
It does not exist as a Linux application under its own name -- PhotoRec. Instead, is is the second of two awesome applications packaged under the name "Testdisk" by CGSecurity.org. Its description calls it a partition scanner and disk recovery tool. So if you are searching the Web for a suitable photo recovery tool, you might easily reject its reference as being something you need.
Very bad decision to bypass this monster tool. Get and install it. It is not a question of if you will need it. The only valid issue is when you will need it.
Remember, this recovery tool has a dual function. You can use one part of it to recover deleted partitions on a hard drive. You can use its constant companion to retrieve deleted images from a variety of locations.
Getting It Going
The disk and file recovery package installed without incident in several versions of Ubuntu, including the latest Ubuntu 11.10 release. It was available directly from the Ubuntu software repository.
Other distros may require you to work a little harder to get it and install it. If you do not see it in your distro's package management offerings, look for a suitable version at the CGSecurity website.
Here is a quick reference for getting this package the long-fingered way.
For Ubuntu users: sudo apt-get install testdisk
For Fedora and CetOS users: yum install testdisk
For other distro users, if all else fails, you may have to download an archived version and compile it for your system.
The Setup
The partition scanner and disk recovery package installs with only a little effort needed if you do not get it through your distro's repository. But it requires no actual setup once installed.
All program controls are built into the command line interface, or CLI. Using it can be a bit daunting. But do not be intimidated by its appearance.
Once you install it, you will not find it listed on any menu. Instead, you will need to open a terminal window from your desktop menu.
Using It
To run the disk partition tool, enter the command testdisk and press the enter key. To run the file retrieval tool, enter the command photorec and press the enter key.
In either case, you will see a series of command options displayed in white against the terminal window's black background. The command prompts step you through the options. Just work your way through it one choice at a time.
The focus here is to retrieve deleted -- and usually unreachable -- graphic images. Both the disk recovery and data retrieval procedures of Testdisk are similar.
For example, both approaches require you to select commands prompted on the terminal display. So I will address the steps in recovering files using the PhotoRec part of Testdisk.
Follow the Prompts
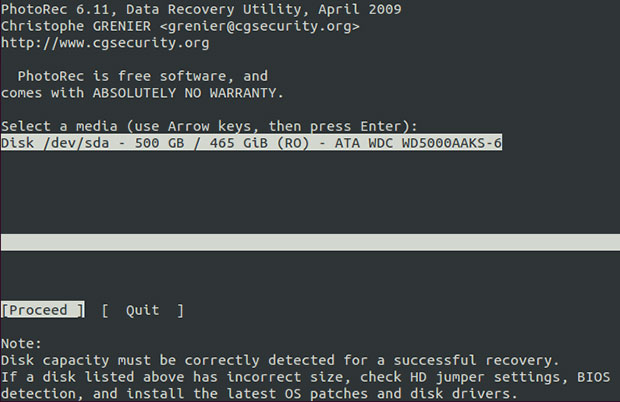
Once you start PhotoRec, you must select the hard drive, USB device, smartcard or other attached media. Do this and all subsequent option selections with the tab and the enter keys. Linux's drive nomenclature is often confusing so make sure you know where you are and where you are going.
Next, select the partition that held the deleted file. After making that selection, you can set File Option to choose the file extension you want to recover. If you do not make a file type selection, you will have a longer wait as all files are searched and displayed.
Now you choose the type of the file system on the device holding the deleted file. If you do not see your system in the list, choose the option Other.
Almost There
The program will prompt you for the location to save the recovered file or files. The easiest solution is to accept the offered home directory.
PhotoRec does not give you file-manager-style browsing. So if you designate another location, make sure you manually enter it precisely. Otherwise, you will not have easy access to the recovered files.
Finally, tell the program if you did not perform write tasks to that original location since deleting the file you want to recover. Do this by selecting Free. If you did writing tasks, select the Whole option.
Now sit back. The scanning and recovery process can take considerable time.
Finding It
As the recovery process progresses, the terminal window will display a list of recovered files. Recovered files appear with names in the form of "recup_dir.1," "recup_dir.2," etc.
A nice feature if you are impatient (as I am) is the ability to access the found files as they appear. You do not have to wait for the full list to populate the terminal window.
When the recovery process is finished, you will see a summary list displayed. Your impatience might cause you to shut the terminal window and interrupt the recovery. Essentially, closing the terminal window exits the PhotoRec application.
No problem. The next time you run PhotoRec, the recovery process will resume.
Bottom Line
PhotoRec is impressively rigorous. It does its magic on a variety of digital storage media. This includes compact flash, Memory Stick, SecureDigital, SmartMedia, Microdrive, MMC, USB memory drives, hard disks and CD/DVD.
Perhaps PhotRec's best asset is its ability to recover files from digital cameras. These devices do not erase photos from storage when you delete photos or reformat the memory card. But other recovery tools typically cannot go there.


Thumbs up because the package actually installed for me on Fedora Core 9 and RHEL 5 without a ridiculous number of third-party dependencies and without requiring newer libraries than the most recent distro updates.